


 Aren't they lovely? I mixed them equally at a 50 /50 ratio, and what I came up with was indeed lovely...just not necessary. In hindsight, I should have just used craft paint. It would have been simpler, less expensive, and I would have achieved the same look. Having said all that, if you are anything like me and determined to find the hard way, check out the Faux Effects website to order decorative products. If you are smart, just go to Micheal's and pick out a good shade of Folk Art craft paint to use as your color.
 OK. So once you have your color picked out, you will also need to purchase "repositional spray adhesive" to hold your stencil on the wall. You can purchase such a thing at any craft store. And speaking of stencils, if you have never checked out Royal Design Studios, you need to. It's owner, Melanie Royals, carries the most extensive and beautiful line of stencils I have ever seen. I purchased my lattice stencil for this project from her for about $40. They come with detailed instructions and are excellent quality.
 Step one to stenciling a room is to plan your layout. If you purchase a stencil from Royal Designs, it will come with instructions on how to do this. Her stencils have "registration marks" in each corner of the stencil. These marks allow you to line your stencil up all the way around your room, keeping your spacing accurate. It is helpful to mark all the way around the room where all your registration marks are so that you can freely move about the room during the process. You cannot stencil one stencil right next to another, as you will be overlapping on wet paint. You must skip about the room while you allow the paint to dry, and the only way you can do this is if you have pre-marked all of your registration marks. Does that make sense?
Step two is to spray the back of the stencil with repositional spray adhesive so that it will stick to the wall and prevent your product or paint from leaking underneath. Are you already thinking that I am weird and completely incapable of explaining this process? No worries, sweet Caroline doesn't think I make any sense either.
 Step three is to line up your stencil with the registration marks where you have decided to begin the process on your wall.
Step four is to start rolling your product over the opening of the stencil.
 And then repeat...
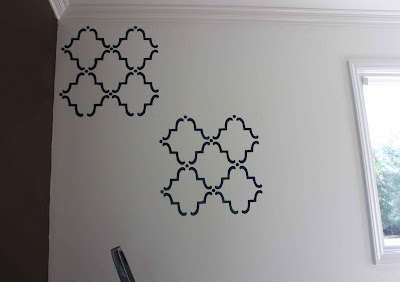 And repeat...
 And repeat...
 And repeat...
 And then stop when you finish. The process is not difficult, it is just tedious...and it may require a glass of wine.
 The window treatments. The two long window treatment panels are hanging on a rod behind the valance. The valance has been attached to a 2 x 4 with a staple gun and hung on the wall using "L" brackets...all my cute carpenter's work.
 I only hire the very best seamstresses...they do great work.
 We carried the bed out and spray painted it red. It was killing me not to set the entire bed up with bed linens and do a photo shoot outside. Seriously, how stinkin' cute would that have been...my kids all cuddled up in white linens on this bed outside?!?! But I had no time for such playful things.
 I had pillows to make. Remember I told you that I loved the look of Serena and Lily's little buddy pillows. I printed the image out on transparency paper and pulled out my overhead projector. Yes, I own an overhead projector and it is one of my favorite toys. I bought it off ebay for $30 and it was worth every penny. Now I am well aware that there are fancy shmancy computer programs out there that will do such things, but I prefer the prehistoric method. I can easily turn the projector on and off...no computer program to learn that will cause me to feel bad about myself when I cannot learn how to use it.
 I traced the pattern onto duck cloth and cut it out.
 Border the edge of the dog cutout using a zigzag stitch, to prevent the fabric's edges from freying.
 Steam a Seam is a product that will stick fabric to fabric. I use it for appliques on shirts for my girls, and it worked great for this project as well. Directions are included, but you basically just use an iron to steam and secure the cutout into place.
 There are two smaller details in the accessories of this room that I think are worth mentioning. In case you are new to Playing Sublimely, I have two tutorials out there in blogger world for monogrammed candles and also decoupaged picture frames. Click here for the candle tutorial, and click here for the picture frame tutorial.

 I am hesitant to click publish on this post, as I feel it to be a poor tutorial on the "how to's" of this room...but if I am being honest, my youngest daughter starts kindergarten today and my brain is somewhere else. As it should be I suppose. But please feel free to email me if you desire to know more about the stenciling process...or anything else for that matter.
 And then repeat...And repeat...
 And repeat...
 And repeat...
 And then stop when you finish. The process is not difficult, it is just tedious...and it may require a glass of wine.
 The window treatments. The two long window treatment panels are hanging on a rod behind the valance. The valance has been attached to a 2 x 4 with a staple gun and hung on the wall using "L" brackets...all my cute carpenter's work.
 I only hire the very best seamstresses...they do great work.We carried the bed out and spray painted it red. It was killing me not to set the entire bed up with bed linens and do a photo shoot outside. Seriously, how stinkin' cute would that have been...my kids all cuddled up in white linens on this bed outside?!?! But I had no time for such playful things.
 I had pillows to make. Remember I told you that I loved the look of Serena and Lily's little buddy pillows. I printed the image out on transparency paper and pulled out my overhead projector. Yes, I own an overhead projector and it is one of my favorite toys. I bought it off ebay for $30 and it was worth every penny. Now I am well aware that there are fancy shmancy computer programs out there that will do such things, but I prefer the prehistoric method. I can easily turn the projector on and off...no computer program to learn that will cause me to feel bad about myself when I cannot learn how to use it.
 I traced the pattern onto duck cloth and cut it out.
 Border the edge of the dog cutout using a zigzag stitch, to prevent the fabric's edges from freying.
 Steam a Seam is a product that will stick fabric to fabric. I use it for appliques on shirts for my girls, and it worked great for this project as well. Directions are included, but you basically just use an iron to steam and secure the cutout into place.
 There are two smaller details in the accessories of this room that I think are worth mentioning. In case you are new to Playing Sublimely, I have two tutorials out there in blogger world for monogrammed candles and also decoupaged picture frames. Click here for the candle tutorial, and click here for the picture frame tutorial.
 I am hesitant to click publish on this post, as I feel it to be a poor tutorial on the "how to's" of this room...but if I am being honest, my youngest daughter starts kindergarten today and my brain is somewhere else. As it should be I suppose. But please feel free to email me if you desire to know more about the stenciling process...or anything else for that matter.
Anybody else sending off a kindergartner this year?


18 comments:
You did an awesome job!!! No apology necessary. Caroline started Kindergarten????? Thomas is in a big boy bed????? Next year at this time, I will be in a heap somewhere on a crying jag! You are a strong woman! And very crafty too! Are you sure you don't want to come for a wonderful weekend in Charleston to decorate my house?!?
you did a fantastic job...and it looks amazing! Thanks for the info.
I love the outcome of your stenciling, just lovely! As far as the tutorial, you did just fine, we all understood it.
My youngest Granddaughter goes to kindergarten this coming school year... she says as tears well up in her eyes.
Where did you find those prints of the dogs wearing dress shirts? They are fantastic!
Amy, are you bananas? That was an excellent tutorial!!! And yes, you could certainly use regular old craft paint...but how fun that you added a little panache! The room looks beautiful and feels special because you poured your own handiwork into it! Thanks for sharing this with us.
What a fabulous room. The outdoor picture would have been great---but hauling the mattress back and forth would have definitely stopped me. My youngest is off to Kindergarten this year too. We go to meet his teacher tonight and Monday morning we put him on the bus. I'm ready and I'm not if you know what I mean.
the title of this post should have been....
"Let me tell you I'm a Rockstar!"
I can't believe the work that went into that stencil.
btw. I have the same little black skirt, and I think I wear it about 3 times a week.
Are you kidding?? I think this post is fantastic! It gives just enough information.
I gotta tell you, Amy. . . I've always thought you were wonderful. But now that I know you have an overhead projector, I've changed my opinion about you from "wonderful" to "over-the-top phenomenally wonderful." Just thought you should know. :)
So nice to meet you! Your room looks beautiful...I love the stenciled pattern on the wall! Thank you for stopping by, you have a wonderful blog, I've really enjoyed reading it an look forward to read more :)
Another post that leaves me sitting here in awe with my mouth hanging open. That looks fabulous and original...and I don't think an interior designer could've dreamed up anything cuter! I officially want to live in your house. Everything looks so pretty and cozy and I just love it! And you did it all in a skirt! HAHA!!! You're amazing!
Love this! I showed my husband your stenciled walls and he thought it was wall paper...we will definitely try this out somewhere in our house. Thanks!!
I love your style. I wish that I was able to piece things together better. I might just try the stenciling idea in my son's room to break up some of the monotony. I keep trying to convince my husband to move our bedroom into the bonus room so that each kid can have their own room. Right now the 2 little girls share. Maybe later on down the road....
Well, if your brain was somewhere else during that tutorial, then I don't even have one! You're incredible -- just lovely work, filled with love.
Hope all goes well with the kindergartner...I sent a kiddo off this year but he was a bit older...it's truly bittersweet.
All of this sounds great, but I would rather you just come and do it all for Asher :)
Gorgeous Amy! Jeff and I have been 'oohing and ahhhing' over it. Love the tutorial. Your blog is always interesting, well-written and inspiring. Hope little Caroline had a wonderful day!
This is just stunning! I love the stencil.
I saw a made bed on a beach in a catalog once and thought the same thing - Maybe I can take my dining table outside and photograph it :-)
ohmyword! everything about this is just incredibly awesome!
Love this bedroom! I have been looking for "something" to go on a feature wall in my 15 year old son's room, and, when I saw this stencil, I knew I'd found what I've been looking for. Thanks for the inspiration.
Post a Comment